I used AI to build a recipe app
Introduction
In the ever-evolving landscape of web development, blending the power of artificial intelligence with modern programming tools is not just fascinating; it’s the future. Building a Recipe App, using an amalgamation of my development skills and AI, has been nothing short of exhilarating. In this blog post, I will take you through my journey, showcasing how I used AI to bring this project to life.
Tools and Technologies I used
- React
- Bootstrap
- CSS
- JavaScript
- ChatGPT
- Spoonacular API
- GitHub
- VS Code
- Figma
The Project’s Genesis
I first had this project idea a while ago, it was a fun way for me to bring together two things I love: cooking and coding. As someone who loves cooking, one question I often run into is “What to make for dinner today?”, so I wanted to build an app that allows me to explore a variety of cuisines, quickly find recipes that match my diet requirements, and permits me to easily create weekly and monthly meal plans.
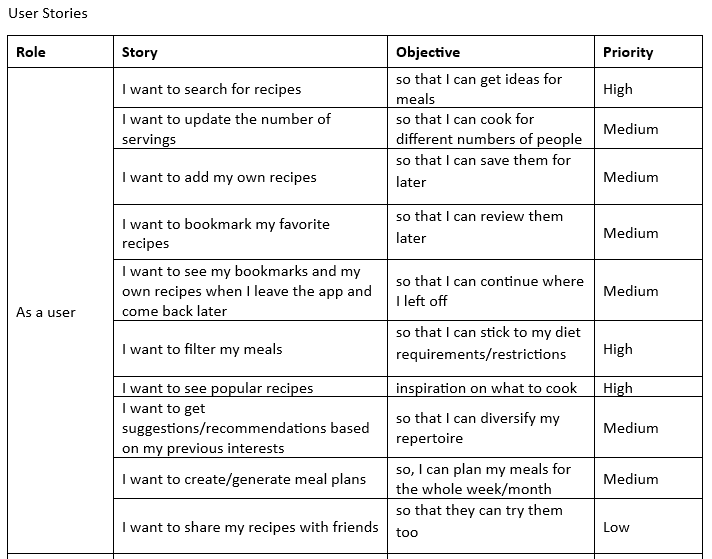
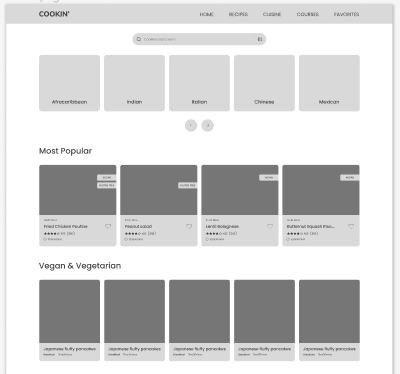
I started by writing some user stories and mapping user stories to functionalities and then I used Figma to create wireframes to help me better visualize what I wanted the end product to look like.
Once I had my wireframes, I was able to easily define the different React components and the file structure of my project. While the core of web development remained essential, the integration of AI made things go so much faster.
AI as the Catalyst
I attended a number of virtual conferences hosted by Eben Page where he talked about the power of AI. As I listened to him I realized 2 things:
- AI is not going away anytime soon.
- Knowing how to work with AI is a necessary skill as it could make things so much easier.
For this project, I decided to think of ChatGPT AI as a very intelligent colleague who could help me navigate through easy and complex tasks.
How I made AI work for me
It started with a simple prompt: I asked ChatGPT to “talk” to me as if I had no experience at all with programming, then I explained my app idea and included my user stories as well as the languages and the API I wanted to use. The first response I got was an overview of the project and the steps I needed to take:
Front-end Development (React):
- User Interface: Design a user-friendly and responsive user interface using Bootstrap 5 for styling. Create components for different views (e.g., search, recipe details, user profile).
- Routing: Implement client-side routing using a library like React Router to handle different views and user interactions.
- State Management: Use React’s state management (useState and useContext) or consider using Redux for more complex state management, especially for user-specific data like bookmarks.
- API Integration: Connect to the Spoonacular API or any other recipe API you prefer to fetch recipe data. Implement search functionality and display recipes.
- User Authentication: Implement user authentication using libraries like Firebase Authentication or implement your own authentication system using Node.js.
- User Stories: Develop features for searching recipes, updating servings, adding personal recipes, bookmarking, filtering, and creating meal plans. Each user story will require its own set of components and logic.
- Persistence: To store user-generated data like personal recipes, bookmarks, and meal plans, consider using a database like MongoDB or PostgreSQL on the back end.
- Local Storage: Use the browser’s local storage or cookies to persist user data like bookmarks and session information.
- Recommendations: Implement a recommendation system based on user preferences. You may need to collect and analyze user data to provide personalized suggestions.
- Sharing: Implement social sharing functionality for recipes, allowing users to share recipes with friends.
Back-end Development (Node.js):
- API Development: Create a RESTful API using Node.js and Express.js to handle user data, personal recipes, bookmarks, and meal plans.
- Database: Choose a database (e.g., MongoDB, PostgreSQL) to store user data. Create database models and set up database interactions using an ORM (Object-Relational Mapping) or ODM (Object-Document Mapping).
- Authentication: Implement user authentication and authorization for protected routes. Ensure that only authenticated users can access certain features like adding personal recipes.
- Recommendation System: Develop a recommendation system based on user activity and preferences. This might involve implementing machine learning algorithms or using libraries like TensorFlow.js.
- Email Notifications: Consider sending email notifications for account verification, password resets, and updates.
- Security: Implement security measures to protect user data, including encryption, input validation, and proper error handling.
Deployment and Hosting:
- Deploy your Node.js server to a cloud platform like Heroku, AWS, or Azure.
- Host your React app on a hosting service like Netlify, Vercel, or GitHub Pages.
- Configure your domain name and set up SSL for secure connections.
Testing and Quality Assurance:
- Write unit tests and integration tests for both the front end and back end to ensure the reliability of your app.
- Perform user testing to gather feedback and make improvements.
Continuous Development:
- Regularly update and maintain your app, adding new features and fixing bugs.
- Keep an eye on the performance and scalability of your app as the user base grows.
Documentation:
- Document your codebase, API endpoints, and deployment process for future reference.
Marketing and Growth:
- Promote your app through social media, blogging, and other marketing strategies.
- Collect user feedback and use it to enhance the user experience.
I started with the first step: building the front end. I asked ChatGPT to walk me through the project setup (create-react-app, installing dependencies, etc) and then generate some starter code. I did not give too much context because I was curious to see what it came up with. The result was okay but not very impressive. I got step-by-step instructions on how to set up my projects, as well as a snippet of code demonstrating how to fetch recipe data with the Spoonacular API.
const fetchRecipeData = async () => {
  try {
    const apiKey = config.apiKey;
    const response = await fetch(
      `https://api.spoonacular.com/recipes/${recipeId}/information?apiKey=${apiKey}`
    );
    if (!response.ok) {
      throw new Error("Failed to fetch data");
    }
    const data = await response.json();
    setRecipe(data);
    setLoading(false);
  } catch (error) {
    setError(error.message);
    setLoading(false);
  }
};
Even though this was a good response for me, I found that it did not work well for my scenario where I was posing as a non-dev and relying on ChatGPT, so I prompted the AI to generate the complete code to fetch recipe data from the API and display it on my screen. This is when I got two components:
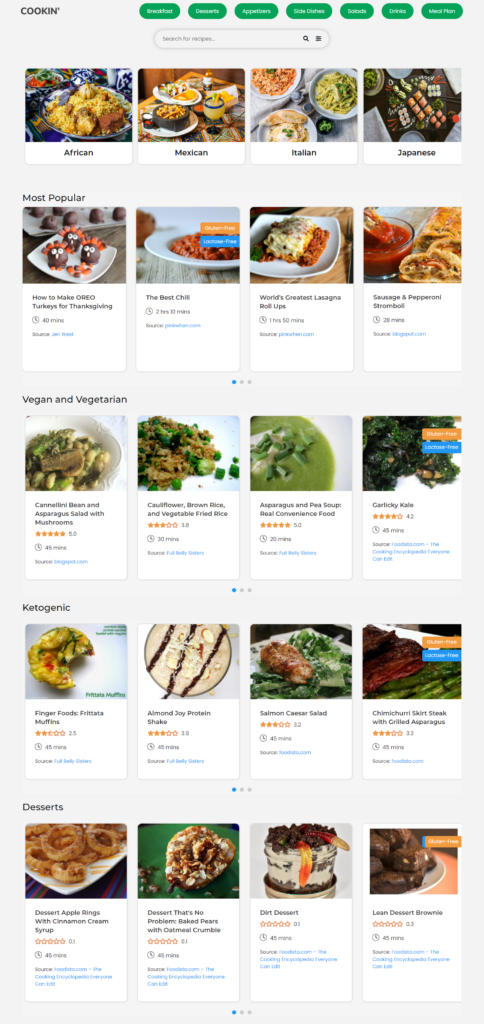
- A SingleRecipe card that holds information about a single recipe (the initial information I got was the recipe title and image)
- A RecipeList component with several SingleRecipe Cards.
This is where things started to get really interesting for me, I then proceeded to feed in the following prompt: Modify the RecipeList and SingleRecipe in the following manner:
- Create a new component to represent popular recipes called “PopularRecipe”, each popular recipe should have an image, the dish type (e.g., lunch, main course, main dish, dinner, etc.), the dish title, the recipe source name with a hyperlink to the source URL, and the meal preparation time. Also, add labels over the recipe image to indicate whether the meal is vegan, gluten-free, or lactose-free. If the meal is vegan, display the vegan label but if it is not vegan, hide the vegan label. If the meal is gluten-free display the gluten-free label but if it is not gluten-free, hide the gluten-free label. If the meal is lactose-free display the lactose-free label but if it is not lactose-free, hide the lactose-free label.
- Create another component called PopularRecipesList. This component should contain 10 popular recipes in a slider. This slider should have controls (clickable arrows) to let the user scroll left and right, as well as indicators to let the user know how far they’ve scrolled. The slider should be a row with 4 equally spaced columns (use d-flex justify-content-between for the spacing). Each of the columns in the row should hold a PopularRecipe card. If the user has scrolled all the way left and there’s no more left scrolling to be done, let the left arrow be greyed out and unclickable. In the same manner, if the user has scrolled all the way right and there’s no more right scrolling to be done, let the right arrow be greyed out and unclickable. Above this slider, add the heading (h2) that reads “Most popular”.
- Also, create a component to represent Vegan and Vegetarian recipes in a card. Call this component VeganVegetarian. Each VeganVegetarian card should have a recipe image, preparation time, and the recipe source name with a hyperlink to the source URL.
- Add the VeganVegetarian to a slider called VeganVegetarianList. VeganVegetarianList should be similar in function to the PopularRecipesList component. Above this VeganVegetarianList slider, add the heading (h2) that reads “Vegan and Vegetarian”.
- Add the PopularRecipesList component and the VeganVegetarianList component to RecipeList. Add a left and right padding of size 3 (use bootstrap to achieve this) to the RecipeList. Create the logic and CSS files to achieve all these in separate, well-labeled files and import them where they are needed. Wherever images are required, use placeholder text that I can replace later. Please clearly comment the code for proper understanding. Ask any questions you may have to produce a proper response.
Note: I think it’s worth mentioning that I created this prompt by looking at my wireframes. I tried to imagine how I would describe my designs to another person.
I built the rest of the project using similar prompts and filling the gaps with my expertise. At times it took several prompts to achieve the desired results, at times I got completely different results from what I expected and had to make adjustments to my prompts or say “That doesn’t seem right, try again” or “modify XYZ section of the code”. There were also times I simply wrote my own code and fed it to the AI either as a starting point or for context. This came in quite handy especially when I needed extra CSS or JavaScript e.g. adding the SearchBar and optimizing the search function.
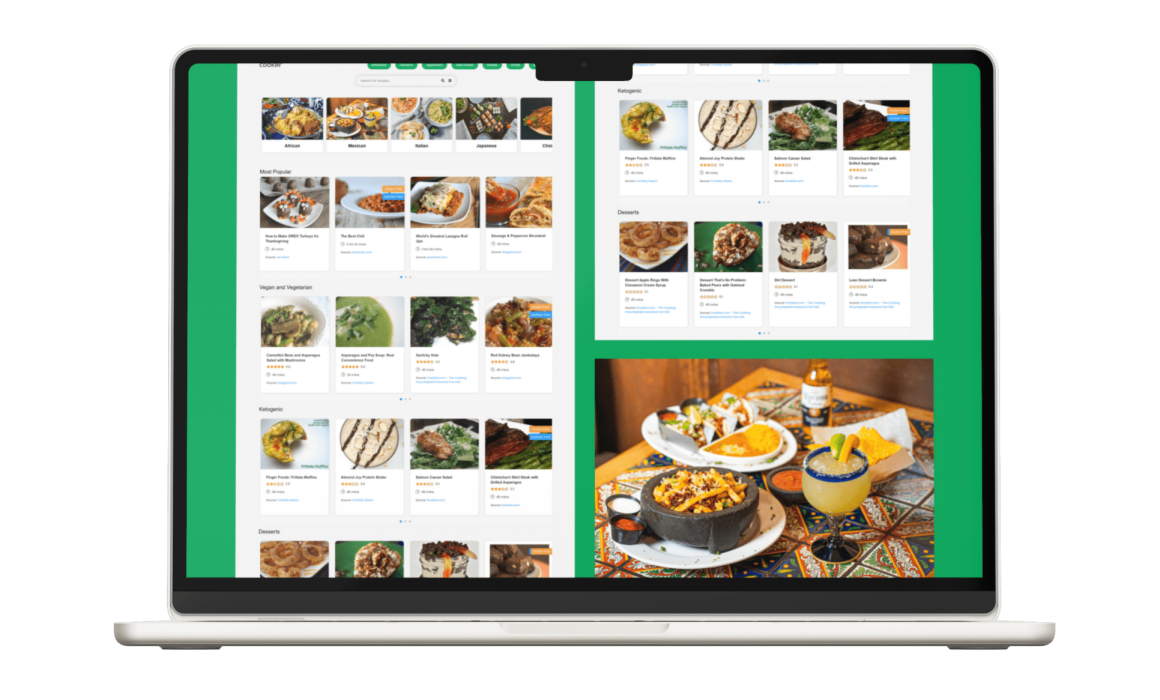
In the end, I was able to build my React components, style them using Bootstrap and CSS, and add different functionality using JavaScript in just a few hours.
Some Challenges I faced
- Several times the AI “forgot” the context of the project and had to be “reminded”. This meant several times I had to provide a project recap to get back on track.
- I ran into some problems with node package versions. The first few times, I just told ChatGPT “Hey I encountered an error, here are the details: [error_details_pasted_from_console] how do I fix this?” and I got some really valuable information. However, there were times when those solutions did not work and I had to use other resources like StackOverflow. One time, following the AI’s recommendation I installed a package that broke my code and I had to start all over.
- Some of the information from ChatGPT was quite outdated. In all fairness, technology is constantly changing and the AI has a disclaimer to this effect.
- Verbosity: I found that it took too many words to achieve results (partially because I could not just point at my screen and say “this” or “that” as I would with a human colleague).
Key takeaways
- Trash in, trash out: The quality of your prompt determines the quality of the output you get. I found that ChatGPT responds quite well to verbosity, you need to explain exactly what you want with as much detail as possible. One trick I used was adding the statement “ask me as many questions as you need in order to provide me the perfect response” to the end of my prompts.
- Proper planning prevents poor performance: To be able to say exactly what you want, you need to know what you want. I suggest writing out your project requirements and user stories, mapping the stories to different features and functionalities, wire-framing/prototyping, etc.
- It helps to have at least some mastery of your subject matter to get good results e.g. understanding the syntax and semantics of the programming language you are using in order to properly manipulate the code or identify and fix bugs. Several times I ended up just writing my own code because the AI appeared to be “confused” about what to do.
- Avoid feeding the AI sensitive information.
- ChatGPT can review your code and suggest updates but you need to feed it your code (which poses a potential security/privacy risk) or provide a really accurate description of said code.
- Read the updated documentation of the languages and tools you are using.
Conclusion
I had so much fun working on this project, from the planning and designing to seamlessly integrating AI, each step was an opportunity to learn and innovate. There were some bumps along the way but the triumphs were sweeter. As technology continues to advance, this project serves as a remarkable example of what is possible when we harness the power of AI in dev projects.
This project is still a work in progress and I plan on making more updates to its look and functionality. Thank you for joining me on this journey